Learn how incredibly easy it is to make yogurt the old fashioned way. Forget cluttering your counter with yet another gadget. No yogurt makers here! I’ll show you how to start and cook a new batch of yogurt, troubleshoot issues that may arise, and how to keep your culture continually without needing to constantly buy new starter.
This post contains affiliate links, which means I may make a small commission on purchases made through links on this blog at no extra cost to you.

Supplies Needed
- Pot (non-aluminum)
- Mason jar or thermos
- Coffee filter or loose fitting lid
- Food thermometer (not totally necessary, but helpful)
- Towels and/or insulated box if using the countertop method
- Milk
- Starter culture (this can be a dehydrated culture or a spoonful of live cultured yogurt)
What kind of milk can I use for making old fashioned yogurt?
You may use skim, 1%, 2%, or whole. The lower the fat content of the milk, the shorter it will take to turn into yogurt and the thinner your yogurt will be. Whole milk will yield the thickest result.
DO NOT use ultra-pasteurized milk. This will cause your culture to fail. Regular pasteurized milk is fine.
You may use raw milk. However, keep in mind that you will be heating the milk and it will no longer be considered raw once heated.
how do you make yogurt the old fashioned way?
First, pour one quart of yogurt into a non-aluminum pot.
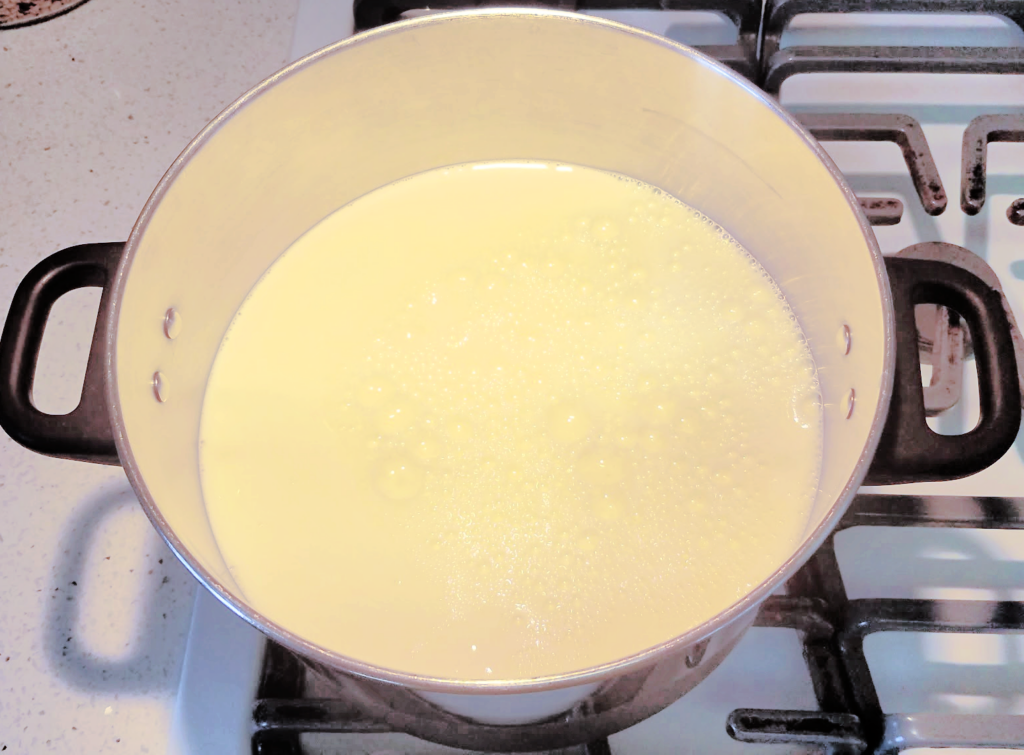
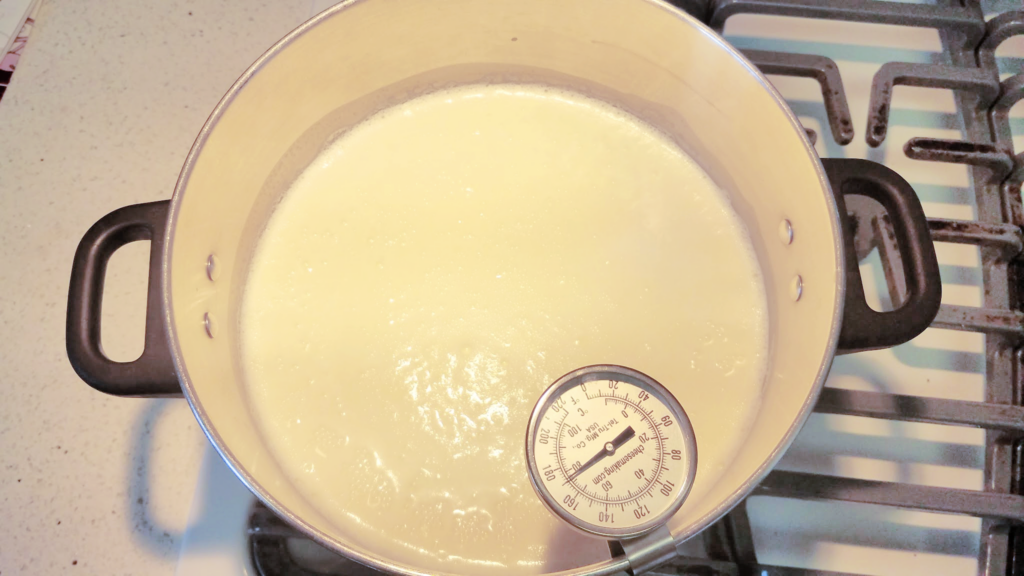
Then, on medium high heat, heat the milk until it is somewhere between 160o F and 180o F. You can use a food thermometer for this for more accuracy. However, you can usually tell it is around this temperature by watching the side of the pot. When the milk starts to bubble and “climb” the side of the pot slightly, you have reached the right temperature.
Once this temperature is reached, reduce the heat slightly and hold between 160oF and 180oF for 20 to 30 minutes.
Afterward, turn off the heat and allow to cool down to 110o F. This is warmer than room temperature but not hot enough to hurt you. If you would like to cool it down quicker, you can put the bottom of the pot into a sink or large bowl of ice water.

Once your milk has cooled to 110o F it is time to add your culture. If using dehydrated culture, add and let it sit for about 5 minutes before stirring in.
You can find dehydrated starter cultures online or you may use a tablespoon or two of plain yogurt with live and active cultures. Saving a few tablespoons of your yogurt in the fridge or freezer is how you can perpetually make yogurt without having to buy new starter every time.

Stir in your culture.

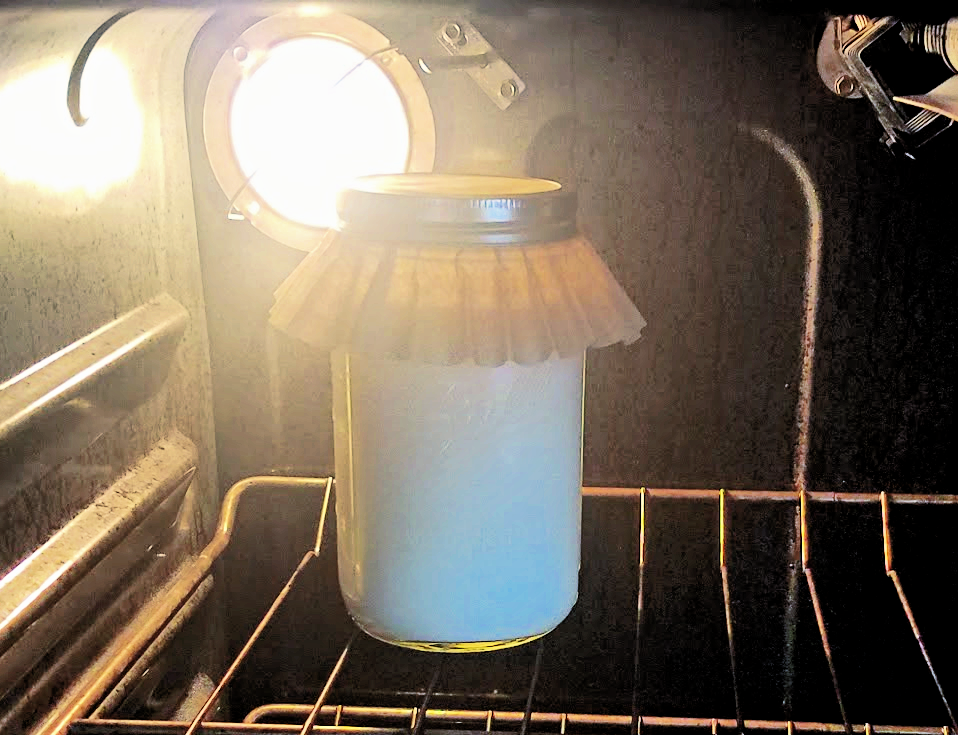
Pour your yogurt mixture into a thermos or glass jar. Make sure to label your container.

Cover the container with a coffee filter. You can also use a non-airtight lid. The culture needs to be covered but it also needs to breathe!

Secure the coffee filter with a canning ring, string, or rubber band.

Yogurt is a thermophilic culture which means it needs heat to thrive. Once you have your yogurt mixture ready you will need to keep it at around 110o F for 7 to 10 hours. Skim will usually take closer to the 7 hour range and whole milk will take closer to the 10 hour mark.
Normally, this is the job that a yogurt maker or sometimes a crockpot or instant pot would do. However, these gadgets are not necessary. Instead, you can keep it on the counter top in a thermos or in a jar wrapped well in towels to insulate it. If you have an insulated lunchbox big enough to keep a jar in then that works too.
The old fashioned way would be to set it somewhere near (but not on top of!) your wood stove. I don’t have a wood stove so my favorite way of doing it is to put it in the oven with only the oven light on. This keeps it warm enough and you can adjust the temperature by moving it either closer to the light or further away.
WARNING!!!! Be sure to put a sign on the stove to be sure no one turns the oven on while your yogurt is setting. This will help avoid any disasters.

Your first time making yogurt you will need to check on it a few times throughout the setting process to make sure you do not let it go too long. You will know it has turned to yogurt when it has a yogurt-like consistency. Some whey on the top is normal but too much can indicate you have gone too long.

Once your yogurt is ready you can refrigerate as usual and it will last for about a week in the refrigerator. I like to flavor mine with home canned jams or jellies and some delicious homemade granola.
And there you have it! Making yogurt the old-fashioned way. If you try this, let me know in the comments how yours turned out! Enjoy!
Help! I overheated the milk! Is is still okay?
That depends. I have overheated it before up into the low 200’s and it still made yogurt just fine, however, if the temperature gets too high it can possibly not turn into yogurt and you will have to start over.
I have cooled the milk and now there is a weird film covering the top. Did I do something wrong?
This is completely normal and a sign that you have done everything right. It is perfectly fine to continue and add your culture.
i have let my yogurt sit for several hours and it has thickened but it has lots of liquid surrounding it. is it still good?
That depends. It is normal to have what is called “whey” separate from the yogurt. This is a byproduct of the culture and is completely edible. It can be clear or have a yellow tint to it. Whey can be poured off before eating. The longer you let it sit, the more tangy the flavor will be and the more whey will separate. However, if the yogurt has curdled and there is a lot of whey you may have let it sit for too long. grab a spoonful of the yogurt curdle to use as your starter culture and try again.
It’s been over 12 hours and it is still the consistency of milk. What can I do?
There are multiple things that may have cause this. You didn’t keep it warm enough, you overheated or underheated the milk, you didn’t cool the milk sufficiently before adding your culture, or your culture may have been old or expired. At this point it is best to start over and try again with a new culture.
This yogurt seems really thin…
If you prefer a more Greek yogurt consistency, you can strain it through several layers of cheesecloth for 10 to 20 minutes after it has finished culturing. This will give you a thicker yogurt. A specific Greek Yogurt starter culture makes a thicker yogurt as well but with a tangier taste.
Shop this post
pin it for later!


Homemade Yogurt
Equipment
- Pot
- Jar
- Coffee Filter
- Rubber Band
- Food Thermometer
Ingredients
- 1 Quart Milk (skim, 1%, 2%, or Whole) Do Not used Ultra Pasteurized Milk, Pasteurized or raw is fine
- 2 Tbsp Yogurt Starter Culture May use plain yogurt with live and active cultures
Instructions
- Add 1 quart of milk to a pot and heat on the stove on medium heat to 160o F to 180o F or until the milk starts to climb the sides of the pot.
- Reduce heat slightly and hold temperature for 20-40 minutes
- Cool to lukewarm at about 110o
- Stir starter culture. If using dehydrated culture, add and let sit 5 minutes before stirring in.
- Pour into jar and cover with coffee filter secured by a rubber band
- Set in oven with only the oven light on for 7 to 10 hours until set
- Refrigerate for up to one week
Leave a Reply